How to Add Fantasy Characters to Photos at Home
July 1, 2026
Adding fantasy characters to photos is defined as the process of compositing AI-generated or sourced fantasy figures into a base photograph by matching scale, lighting, and perspective to create a believable scene. This technique sits at the intersection of AI photo editing and traditional compositing, and it is now accessible to families and creative individuals without any professional training. Whether you want a dragon perched on your bookshelf or a fairy glowing in your garden, the results depend on a handful of repeatable techniques. This guide walks you through every step, from choosing the right tools to fixing the most common mistakes.
How to add fantasy characters to photos: tools and what you need first
The right setup makes the difference between a magical result and a flat, unconvincing edit. Before you place a single character, you need three things: a quality source photo, a fantasy character asset, and an editing environment that can handle layers and masking.
AI photo editing tools fall into three broad categories for this kind of work. First, AI character generators let you describe a character in text and receive a rendered image. Being specific in your prompts produces more professional and natural results. "A glowing fairy with silver wings standing in soft morning light" will outperform "a fairy" every time. Second, compositing tools handle the layering, masking, and blending that make the character feel like part of the scene. Third, photo enhancement tools correct color, sharpness, and noise after the composite is assembled.
High-resolution source images are the foundation of any good composite. Low-resolution crops are one of the most common causes of poor quality results, and upscaling after the fact rarely recovers lost detail. Shoot or select your base photo at the highest resolution your device allows. Match the focal length of your character asset to your base photo as closely as possible. A character rendered with a wide-angle perspective will look wrong in a photo taken with a telephoto lens.
| Feature category | What it does | Best for |
|---|---|---|
| AI character generation | Creates fantasy figures from text prompts | Families with no existing character assets |
| Compositing and masking | Layers and blends characters into photos | Precise, realistic integration |
| Photo enhancement | Corrects color, tone, and sharpness | Final polish and realism |
Hardware requirements are modest. A modern laptop or desktop with at least 8GB of RAM handles most AI editing tasks without slowdown. A tablet with a stylus helps with fine masking work, but a mouse works fine for beginners.
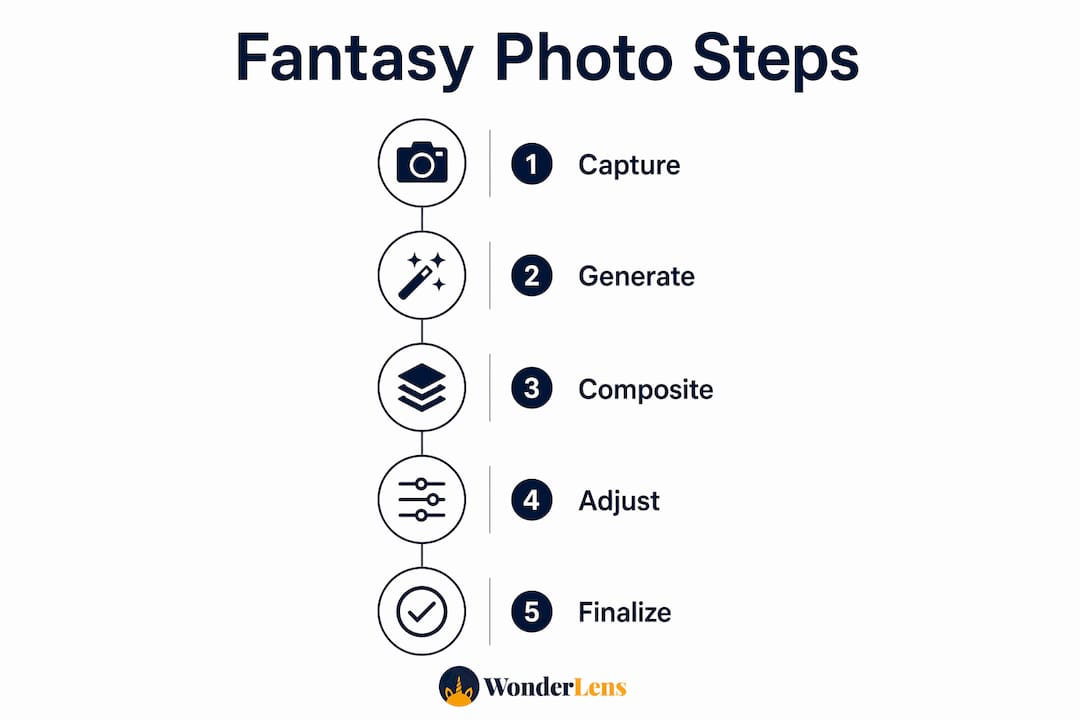
Step-by-step guide to inserting fantasy characters into your photos
A clear workflow prevents the most common errors and keeps the editing process enjoyable rather than frustrating.
-
Select or generate your fantasy character. Use an AI character generator to create your figure, or source a high-resolution character image with a transparent background. Fantasy character generators offer style presets including art, anime, and classic fantasy, so you can match the mood of your base photo. Save the character as a PNG file to preserve transparency.
-
Prepare your base photo. Open your base photo in your editing environment. Check the lighting direction. Note where the main light source falls, whether it is a window on the left, afternoon sun from the right, or an overhead lamp. You will need this reference throughout the process.
-
Place and scale the character. Import the character as a new layer above your base photo. Scale it so the character's proportions feel natural relative to objects in the scene. A fairy should not be the same height as a dining chair unless that is intentional.
-
Align to the horizon line. Aligning the character's eye height to the scene's horizon line is the single most reliable way to achieve perspective consistency. If your photo was taken at standing height, the horizon sits roughly at adult eye level. Place your character so its eyes meet that same line. For ground-level creatures like dragons or rabbits, align their feet or base with the scene's vanishing lines instead.
-
Mask and refine edges. Use a layer mask to remove any remaining background from the character. Zoom in to 100% and refine the edges around hair, wings, or fur. Soft, slightly blurred edges on organic shapes look more natural than hard cuts.
-
Match the lighting direction. Matching the light direction between your character and your photo is the most critical compositing step for believability. If the light in your photo comes from the left, the character's highlights should also fall on the left side. Use a Curves or Brightness adjustment clipped to the character layer to reinforce this.
-
Add a ground shadow. Create a new layer beneath the character. Paint a soft, dark ellipse or shape where the character meets the ground or surface. Shadow opacity between 30% and 60% produces the most natural results. Adjust the blur and direction to match the shadows already present in the scene.
-
Match color temperature and tone. Apply a Color Balance or Hue/Saturation adjustment clipped to the character layer. Warm the character slightly if your base photo has warm afternoon light. Cool it down for overcast or indoor scenes. Subtle post-production beyond placement is what separates convincing composites from obvious fakes.
-
Export your final image. Flatten the layers and export at full resolution. Save a layered version separately so you can return and adjust later.
Pro Tip: Capture a reference photo of a shadow in your actual shooting environment before you start editing. That reference tells you the exact angle, softness, and color of shadows in the scene, making your composite shadow far more accurate.
Common challenges when you add magical creatures to images
Even careful editors run into problems. Knowing what to look for saves hours of frustration.
- Perspective mismatch. The character looks like it is floating or sinking into the floor. Fix this by revisiting the horizon line alignment and checking that the character's feet or base align with the scene's vanishing lines.
- Inconsistent lighting. The character looks lit from a different direction than the rest of the photo. Go back to step six and use a Curves adjustment to darken the side of the character facing away from the light source.
- Low-resolution character assets. The character looks blurry or pixelated against a sharp background. Use an AI upscaling tool to increase the character's resolution before compositing. Starting with a low-resolution asset rarely ends well, no matter how good your technique is.
- Color temperature mismatch. The character looks too blue in a warm scene, or too orange in a cool one. A targeted Hue/Saturation or Color Balance adjustment clipped to the character layer corrects this quickly.
- Hard, unnatural edges. The character looks cut out rather than present in the scene. Feather the layer mask slightly and add a thin, semi-transparent fringe that picks up the ambient color of the background.
Pro Tip: Take your finished composite and add a single, very subtle vignette or film grain layer over the entire image. This unifies the character and the background under the same visual texture, which makes the whole scene feel like one photograph.
AI solutions that analyze image lighting and perspective automatically handle many of these adjustments, which is a significant advantage for families who want great results without spending hours on manual corrections.
Creative ideas for fantasy character photo enhancements
Fantasy photo manipulation is not just a technical exercise. It is a storytelling tool. Adding animated characters to family photos creates memories that feel genuinely magical, especially for children who see their favorite creatures appearing in their own living room or backyard.
The most memorable results come from choosing a fantasy style that fits the mood of your existing photo. A cozy indoor shot with warm lamp light suits a glowing fairy or a small elf. A wide outdoor landscape with dramatic clouds suits a dragon or a giant. Forcing a mismatched style, like a pastel anime unicorn in a gritty urban photo, breaks the illusion immediately.
Visual storytelling composition principles apply directly here. Place your fantasy character at a natural intersection point in the frame, not dead center and not cropped awkwardly at the edge. Give the character space to "look into" the scene rather than out of the frame.
| Edit type | Character examples | Best occasion |
|---|---|---|
| Subtle enhancement | Fairy lights, small elves, glowing orbs | Everyday family photos |
| Moderate transformation | Unicorns, friendly dragons, holiday figures | Seasonal and holiday memories |
| Full fantasy scene | Epic dragons, mythical landscapes, full creature scenes | Creative portfolios, special events |
Integrating fantasy into home photos works especially well for holiday traditions. A photo of your living room with a realistic Santa figure casting a shadow from the fireplace light creates a keepsake that children remember for years. The key is always realism in the details: matching shadows, matching light color, and a character that looks like it belongs in that specific space.
Key Takeaways
Successful fantasy character compositing requires matching lighting, perspective, and color tone, not just placing a character on top of a photo.
| Point | Details |
|---|---|
| Start with high-resolution assets | Low-resolution character images produce blurry composites that no technique can fully fix. |
| Align to the horizon line | Match the character's eye height or base to the scene's horizon for natural perspective. |
| Shadow opacity matters | Set ground shadow opacity between 30% and 60% to match real shadows in the scene. |
| Color tone matching is non-negotiable | Clip a Color Balance adjustment to the character layer to match the scene's light temperature. |
| AI tools speed up the process | AI editing platforms handle lighting and perspective analysis automatically, saving significant time. |
What I have learned after years of fantasy compositing
The biggest mistake I see beginners make is treating character placement as the finish line. They drop a dragon into a photo, scale it roughly, and call it done. The result looks like a sticker, not a scene. The real work starts after placement.
I have found that the single highest-leverage habit is capturing a reference shadow photo in the actual environment before editing. Walk outside, hold up a piece of cardboard, and photograph the shadow it casts. That one reference image tells you everything: the angle, the softness, the color cast. No amount of guessing replicates it.
The other thing I push back on is the idea that you need expensive software or advanced skills. Non-technical users can describe edits in natural language and get genuinely good results from modern AI tools. The technique still matters, but the barrier to entry is lower than it has ever been. What separates good composites from great ones is attention to the small things: a slightly warm highlight on the character's shoulder, a faint reflection in the floor, a shadow that falls at exactly the right angle. Those details are what make a child gasp when they see a unicorn standing in their backyard.
My honest advice: spend 80% of your editing time on lighting and shadow, and only 20% on the character itself. The scene sells the magic, not the creature.
— Jeremiha
Wonderlens makes fantasy character editing effortless
Creating a realistic fantasy scene used to take hours of manual compositing work. Wonderlens changes that by using AI to handle the hardest parts automatically, including lighting analysis, shadow casting, and perspective matching, so your family gets a cinematic result in minutes.

With Wonderlens, you upload a photo of your home, choose a fantasy character like a unicorn, dragon, or fairy, and the platform places it into your space with realistic shadows and lighting that match your actual room. The result is a shareable 10-second animated video that looks like the creature is truly there. Credits start at $1.99, making it an affordable way to create magical memories for any occasion. Start creating your first fantasy scene today and see the difference that real AI compositing makes.
FAQ
What does it mean to add fantasy characters to photos?
Adding fantasy characters to photos is the process of compositing a fantasy figure, such as a dragon, fairy, or unicorn, into a base photograph by matching scale, lighting, and perspective to create a realistic scene.
Do I need advanced editing skills to insert fantasy characters?
No. Modern AI tools let non-technical users describe edits in natural language and receive realistic results without manual compositing knowledge.
How do I make a fantasy character look realistic in a photo?
Match the character's lighting direction to the scene, align its eye height or base to the horizon line, and add a ground shadow with opacity between 30% and 60% for the most natural result.
What is the most common mistake in fantasy photo editing?
Placing a character without adjusting color temperature and shadows is the most common error. Subtle post-production corrections beyond placement are what make composites convincing.
Can I add fantasy characters to photos at home without special hardware?
Yes. A modern laptop or desktop with at least 8GB of RAM handles most AI-powered fantasy character editing tasks without any specialized equipment.
Recommended
- Why integrating fantasy into home photos creates magic — WonderLens | WonderLens
- Creative photo animation steps for magical family memories — WonderLens | WonderLens
- How to Animate Family Photos: A Magical Guide. WonderLens | WonderLens
- Add animated characters to family photos: magical memories — WonderLens | WonderLens