How to add Santa to your photos for holiday magic
May 6, 2026

Imagine your little one's face lighting up when you show them a photo of Santa Claus standing right there in your living room, beside the Christmas tree you decorated together. That kind of magic is not reserved for professional photographers or tech wizards. Any parent with a smartphone or laptop can create a convincing, joyful Santa photo that makes the holiday season feel truly extraordinary. This guide walks you through everything you need, from the simplest sticker apps to cutting-edge AI tools, so you can craft a personalized holiday memory your child will talk about for years.
Table of Contents
- What you need before you start
- Step-by-step: How to add Santa to your photos
- Tips for the most magical (and believable) results
- Troubleshooting and common mistakes to avoid
- What parents really want: Holiday magic that feels real
- Bring your holiday photos to life with WonderLens
- Frequently asked questions
Key Takeaways
| Point | Details |
|---|---|
| Start simple | Sticker apps and overlays give quick results with minimal setup, perfect for beginners and busy parents. |
| Aim for realism | Match lighting and perspective, adjust size, and blend edges to make Santa look like part of the original photo. |
| Try AI tools | AI-powered editors can automatically place Santa convincingly, offering impressive results with little effort. |
| Magic over perfection | Children value the surprise and wonder far more than flawless edits—focus on the experience. |
What you need before you start
Before diving into the photo editing steps, let's make sure you have everything ready to go. Knowing your options up front saves you a lot of time and frustration.
There are four main approaches to adding Santa to a photo, and each one suits a different skill level and goal.
- Dedicated holiday photo apps: Apps like the Santa Claus Photo Editor on Google Play offer sticker overlays, festive frames, a built-in camera, and simple one-tap export. Perfect for parents who want results in under five minutes.
- Classic desktop editors: Tools like CyberLink PhotoDirector let you import your own home photo, add a stock Santa image, use a background removal tool, and place Santa exactly where you want him. Great for more polished results.
- Design platforms: Canva is a browser-based favorite that lets you layer Santa hat graphics and festive elements onto any uploaded photo. No software download required.
- AI-powered platforms: These tools let you describe the scene and generate a realistic Santa placement automatically. The most advanced option, and the most impressive.
Here is a quick comparison to help you pick the right method:
| Method | Skill level | Device needed | Cost | Realism |
|---|---|---|---|---|
| Sticker apps | Beginner | Smartphone | Free | Playful |
| Canva | Beginner | Any browser | Free/paid | Moderate |
| PhotoDirector | Intermediate | Computer | Free/paid | High |
| Photoshop | Advanced | Computer | Paid | Very high |
| AI platforms | Beginner | Any browser | Low cost | Cinematic |
Most parents will be happy with a smartphone and a good app. If you want something that looks like Santa actually visited your home, check out Santa in your living room for a sense of what realistic results can look like.
Pro Tip: Download three or four different Santa images in advance, including both full-body and close-up versions, so you can test which one fits best with your specific room photo. A Santa image with a soft, warm background is usually easiest to cut out cleanly.
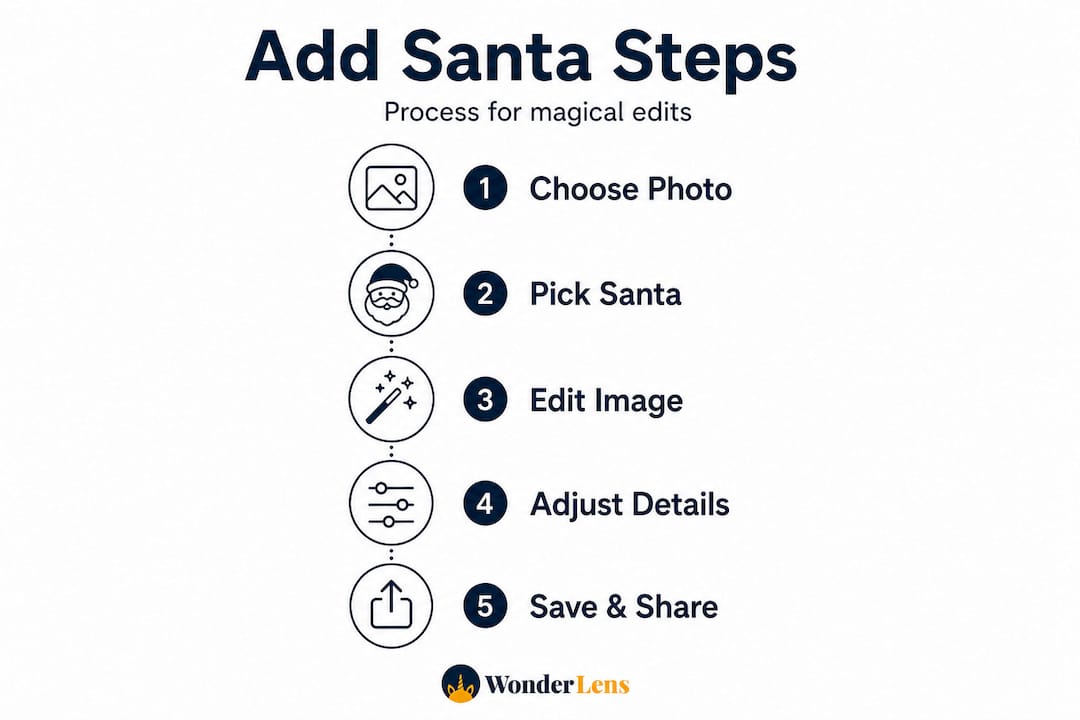
Step-by-step: How to add Santa to your photos
Now that you've selected your tools, let's walk through the most popular ways to add Santa to any holiday photo. Each method below is laid out in simple steps so you can follow along without getting lost.
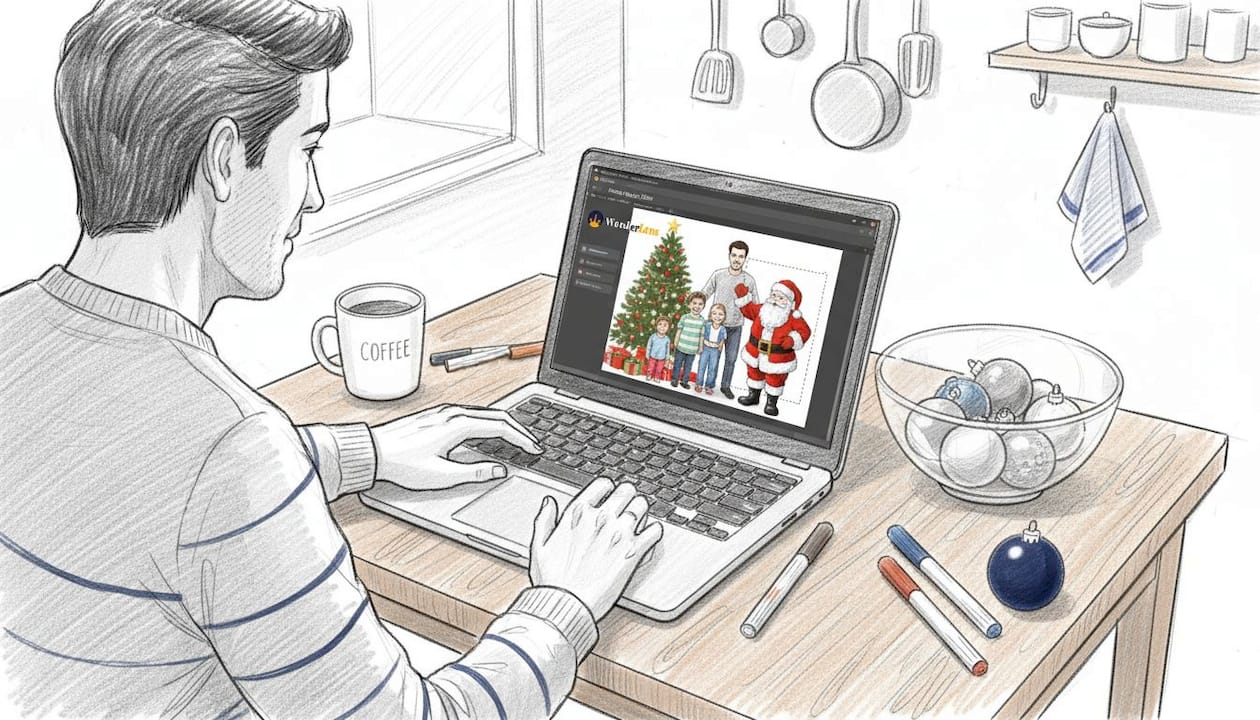
Method 1: CyberLink PhotoDirector (desktop)
This is a solid choice if you want a clean, realistic result and have a few extra minutes to invest.
- Open PhotoDirector and import your home or family photo.
- Find a high-quality Santa image online (PNG with transparent background works best).
- Use the background cutout tool to remove any white or colored background from the Santa image.
- Drag Santa into your photo and adjust his size so he looks proportional to your furniture and family members.
- Fine-tune his position, rotate slightly if needed, and export the finished image as a JPG or PNG.
Method 2: Sticker app (mobile, beginner-friendly)
This is the fastest option, and kids actually love the playful, bold look.
- Download a holiday sticker app like the one found on Google Play.
- Open the app and either take a new photo or upload one from your gallery.
- Browse the Santa sticker library and choose your favorite Santa style.
- Drag and resize the sticker to fit naturally in your scene.
- Add any extra festive decorations, frames, or text, then save or share directly.
Method 3: Photoshop (advanced)
For parents who already use Photoshop, this method gives you the most creative control. The drag-and-drop approach with layer masks and manual lighting adjustment produces stunning results. You open both your family photo and a Santa PNG as separate layers, use a layer mask to blend edges seamlessly, and then add a soft shadow underneath Santa's feet to ground him in the scene.
Method 4: Canva (browser, no download)
Canva is wonderfully simple. Upload your family photo as the background, then search "Santa hat" in Elements, position it on someone's head, and export as PNG or JPG. It works beautifully for adding Santa hats to every family member or placing a playful Santa silhouette near the fireplace.
Method 5: AI editor (fastest for realism)
This is where things get really exciting. With an AI photo editor, you simply upload your photo, describe where and how you want Santa to appear, and the AI generates a realistic result in seconds. No manual cutting, no layer fussing. Just upload, describe, and download. This method is also a great starting point for learning more about AI-powered photo magic and what is now possible for everyday families.
Here is a side-by-side comparison of what each method delivers:
| Method | Time needed | Realism | Kid-friendliness | Price |
|---|---|---|---|---|
| Sticker app | 2 minutes | Playful | Very high | Free |
| Canva | 5 minutes | Moderate | High | Free |
| PhotoDirector | 15 minutes | High | Medium | Free tier available |
| Photoshop | 30+ minutes | Very high | Low | Subscription |
| AI editor | 3 minutes | Cinematic | Very high | Low cost |
You can also explore what a fully animated Santa experience looks like in an AI Christmas video guide if a still photo isn't enough to capture the magic you have in mind.
Pro Tip: For children under six, stick with the sticker app or Canva method. The bold, colorful Santa graphics are actually more believable to very young kids than a perfectly realistic Photoshop edit. Save the advanced methods for older children who might scrutinize the image more carefully.
Tips for the most magical (and believable) results
With your Santa added to the scene, it's time to step up the magic and make your photo look truly convincing to little ones.
Here is a quick checklist of realism essentials:
- Clean background removal: A Santa cutout with rough or jagged edges is a dead giveaway. Use the background removal tool carefully or choose a PNG that already has a transparent background. Following a checklist for realism that includes good Santa image selection, clean background removal, and correct placement will make a noticeable difference.
- Correct scaling: Santa should look proportional to everything else in the frame. If your couch is visible, Santa should not be taller than the ceiling or smaller than a throw pillow.
- Match the angle: If your room photo was taken from a slightly low angle, tilt Santa's image slightly to match.
- Lighting direction: This is the detail most parents overlook. If the light in your room comes from the left, Santa should appear brighter on his left side too. When using sticker libraries or Canva, adjusting shadow and opacity settings helps Santa blend far more naturally into your scene.
- Add a shadow: Even a subtle drop shadow beneath Santa's feet makes him look grounded rather than floating.
- Harmonize with a filter: Apply the same photo filter or color tone to the entire image after placing Santa. This pulls everything together visually and makes the edit feel cohesive.
Following best holiday photo practices does not require expensive software. A little attention to lighting and scale goes a very long way.
Pro Tip: After adding Santa, apply a warm golden filter or a slight vignette to the whole image. This ties the colors together and gives the photo that cozy, candlelit Christmas feel that makes everyone love it.
A little imperfection is perfectly okay. When children are filled with holiday excitement, they are not looking for flaws. They are looking for Santa. A slightly off shadow or a small color mismatch will go completely unnoticed when your child sees their living room with Santa standing in it.
You can also explore how layering extra effects works beautifully in contexts like adding fairies to holiday videos, where the same principles of light, scale, and color harmony apply.
Troubleshooting and common mistakes to avoid
Even with guidance, not every attempt is perfect. Here is how to fix the most frequent pitfalls and wow your family.
Lighting or proportion mismatches are the most common failure modes in holiday photo overlays, especially when using Canva or sticker apps. Here is how to handle the issues you are most likely to run into:
- Santa looks like he is floating: Add a drop shadow directly below him. Even sticker apps have a shadow toggle. This single fix makes a huge difference in how grounded Santa appears.
- Santa is way too big or too small: Compare his height to a door frame or a person in the photo. A real adult Santa would be roughly the same height as any adult in the picture. Scale accordingly.
- The edges look jagged or rough: If your background removal tool left a rough edge, zoom in and manually erase the problem spots using an eraser brush set to a soft edge. Alternatively, choose a different Santa photo with a more contrast-rich background, which makes cleaner cutouts much easier.
- Colors look mismatched: Santa's image might have a cool blue tone while your living room photo has warm yellow lighting. Try adjusting the hue and saturation of Santa's layer to bring the colors closer together.
- Blurry overlays: If the original Santa image is low resolution, it will look blurry when enlarged. Always start with the highest resolution Santa image you can find, ideally at least 1000 pixels wide.
- Same Santa, every time: If the first Santa image you try doesn't look right, swap it out. Testing two or three different Santa photos often reveals one that fits your room's lighting and layout naturally. Visit realism in digital holiday media to understand what separates a convincing result from an obvious edit.
Each of these fixes takes less than two minutes but significantly improves the final result.
What parents really want: Holiday magic that feels real
Now that you know the practical steps, it's worth reflecting on why this little holiday tradition means so much to kids and families.
We have seen parents spend hours perfecting a Santa photo edit, fine-tuning shadows and color tones with impressive dedication. And we have seen parents spend five minutes with a sticker app and produce a photo that made their child burst into tears of wonder. The technical quality was wildly different. The emotional result was almost identical.
That tells you something important. Children do not evaluate holiday photos the way adults do. They are not checking for edge blending or lighting accuracy. They are feeling the story. And the story is simple: Santa was here. In our home.
The real power of any digital Santa tool is not in the pixels. It is in the conversation that follows the photo. "Look, he was standing right next to the fireplace!" That moment of shared storytelling between a parent and child is what creates a lasting memory. The photo is just the spark.
We also believe strongly that you should not wait for the perfect setup. A slightly blurry Santa, placed in a photo taken on a Tuesday afternoon with toys on the floor, can be just as magical as a carefully composed shot. The "imperfect" details often make it feel more real, not less.
So whether you use a free sticker app or a cinematic AI tool, what matters is that you made the effort. That effort is visible to your child, even when they cannot articulate why the photo feels special. Explore how Santa animations and family wonder work together to deepen that sense of belief, and you will quickly see that the magic you create is about far more than technology.
Bring your holiday photos to life with WonderLens
If you want to go beyond a still photo and give your family a truly cinematic holiday moment, WonderLens makes it remarkably easy. Instead of manually cutting and placing Santa into a photo, WonderLens uses advanced AI to generate realistic Santa photos and short animated videos that show Santa moving through your actual living space. The lighting, shadows, and movement are all handled for you.
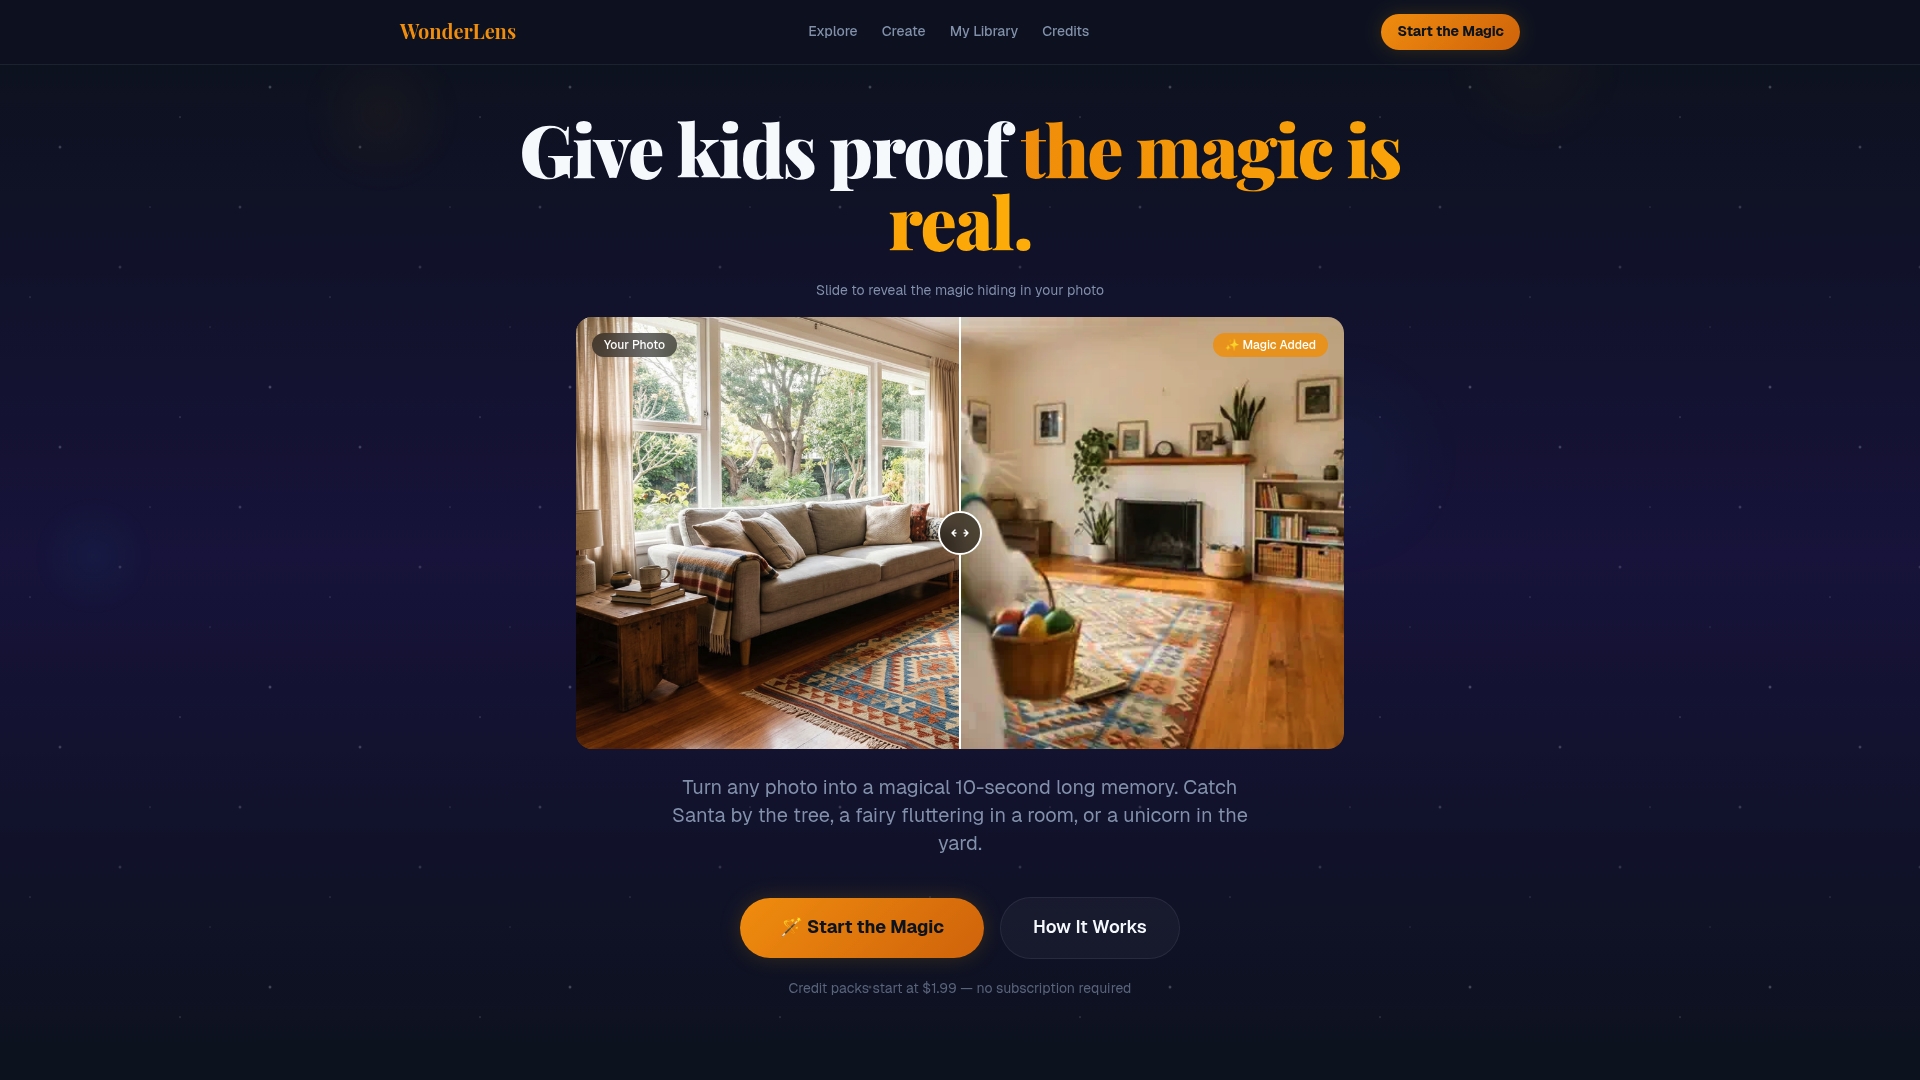
You can create a personalized 10-second animated Santa video starting at just $1.99. It is safe, family-friendly, and requires no editing experience whatsoever. If you are curious about what a fully animated holiday experience looks like, explore the AI Christmas video options and see how families are using WonderLens to make Christmas morning feel truly unforgettable. This is the kind of holiday memory that gets shared, saved, and rewatched every single year.
Frequently asked questions
What is the easiest free app to add Santa to a photo for beginners?
The Santa Claus Photo Editor on Google Play is ideal for fast, sticker-style Santa edits with festive frames and one-tap export, making it perfect for parents with no editing experience.
How do I make Santa look realistic in my family photo?
Choose a Santa image with lighting that matches your room, use a background removal tool for clean edges, and carefully adjust his size and position so he looks proportional to everything else in the scene.
Can I add Santa to a photo online without downloading any software?
Yes, with an AI online editor you simply upload your photo, describe where you want Santa placed, and download the finished result without installing anything.
How can I avoid common mistakes when adding Santa overlays?
Focus on matching the lighting direction, scaling Santa to a believable size, and softening his edges, since proportion and lighting mismatches are the most common reasons an overlay looks fake.
Are there options for animated or video Santa effects, not just still photos?
Absolutely. Several platforms, including WonderLens, let you generate short animated videos showing Santa moving through your home with realistic lighting and shadows, taking your holiday magic well beyond a single still image.
Recommended
- Catch Santa Claus in Your Living Room — Realistic Video Proof | WonderLens | WonderLens
- How to add fairies to holiday videos kids will love — WonderLens | WonderLens
- Catch Santa in Your Living Room — Cinematic Video Proof | WonderLens
- How Santa animations enhance Christmas magic for kids — WonderLens | WonderLens